|
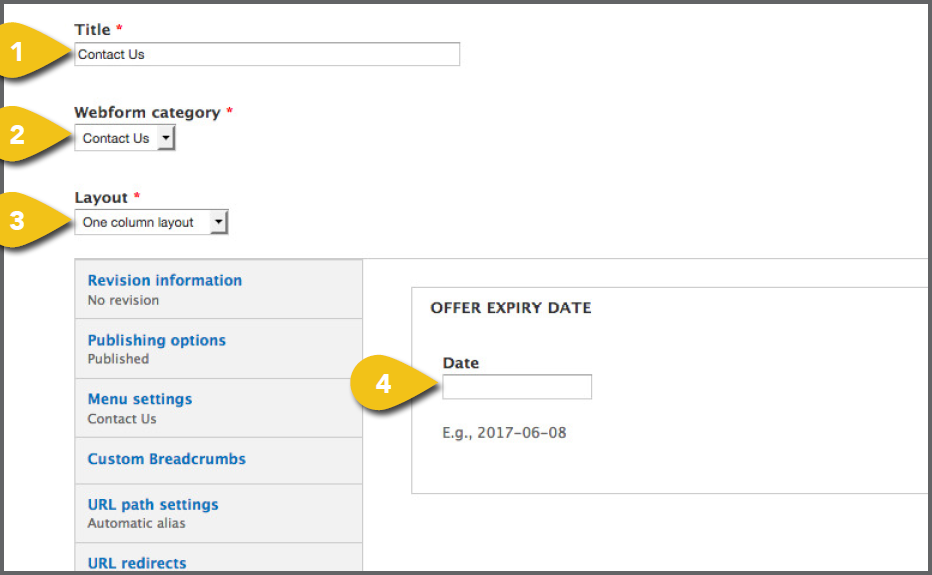
The steps below outline the process for creation of a one page Contact Us form, but Step 1. Create a New Form Page First, select Create A Webform from the 1. Title: Add the form name. There’s no need to include the word “form.” Simply call it “Contact Us,” “Sign Up Now” or something 2. Webform Category: Different categories 3. Layout: Select a one-, two- or three-column layout for desktop viewing. All forms collapse down to a single column as they resize for mobile. 4. Offer Expiry Date: At the top of the tabbed section, enter the end date, if applicable. If there is no end date, leave blank. |
|

|
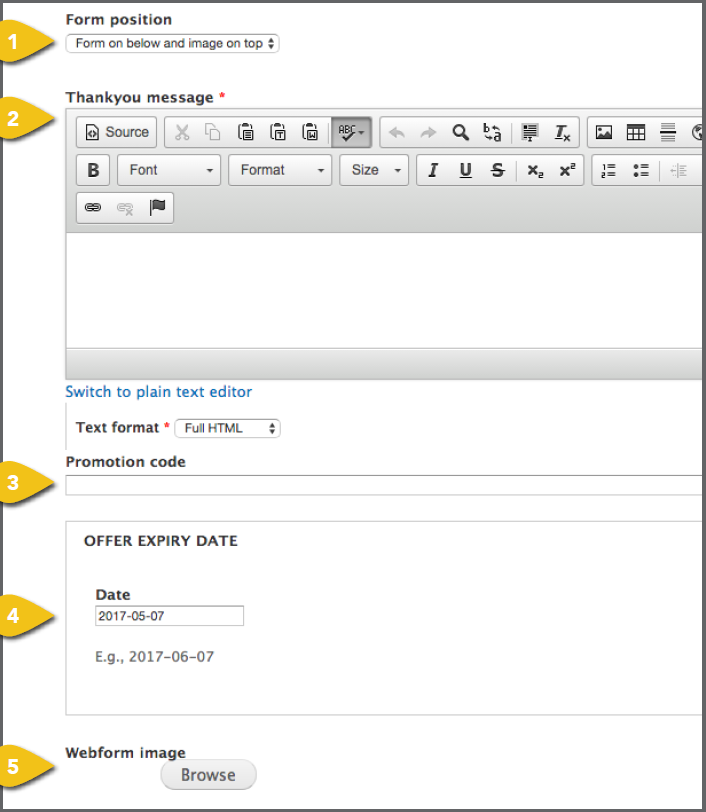
Webform Tabs If you select Webform as the category, three unique tabs appear. Webform 1. Form Position: Select where you want your form to appear relative to any image 2. Thankyou Message: Enter a message to be displayed for the user upon submission 3. Promotion Code: Enter a code, if needed, that will be required for form submission. 4. Offer Expiry Date: At the top of the tabbed section, enter the end date, if applicable. If there is no end date, leave blank. 5. Webform Image: Visit Add an Image for detailed instructions on choosing an image |
|

|
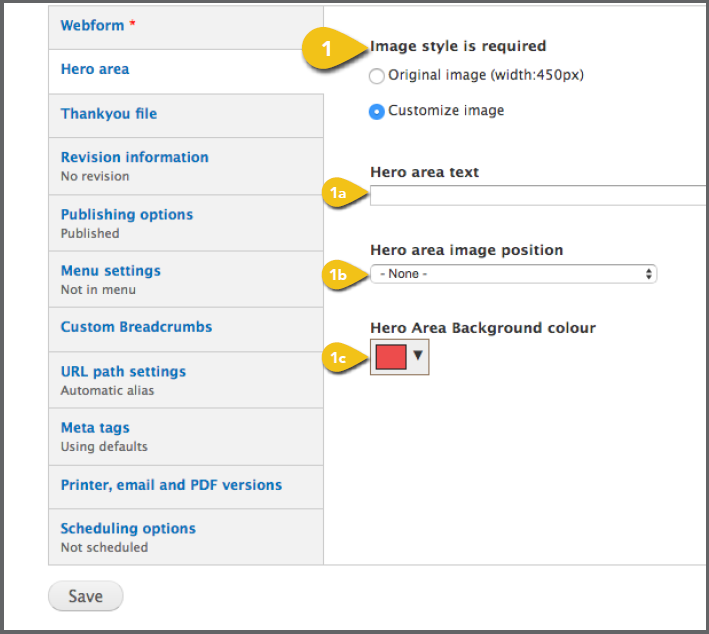
Hero Area 1. Image Style: Identify whether you would like the original image to be displayed as uploaded, or if you want to customize it. If you select Customize Image, you will be offered additional options. a. Hero Area Text: Enter any text you b. Hero Area Image Position: Select c. Hero Area Background Color: • Enter a hex color code in the text field and click Choose. It is preferable to enter the hex values in the field provided, to make sure • If necessary, you can select a color |
|

|
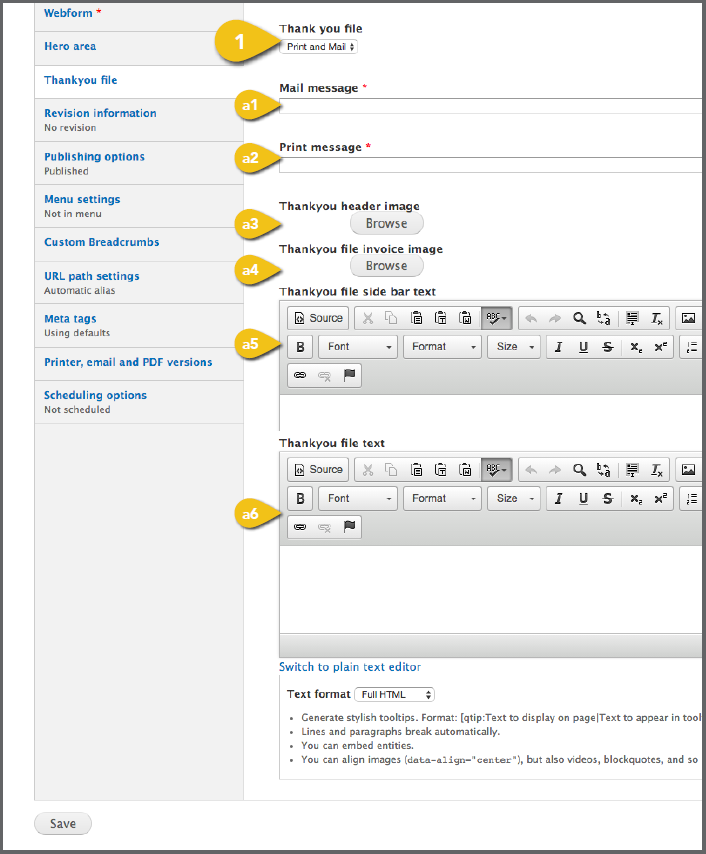
Thankyou File 1. Thankyou File: This section configures a. Print and Mail 1. Mail Message: Enter the message 2. Print Message: You can enter a 3. Thankyou Header Image: If you have an image to appear in the header, add it here. Visit Add an Image for detailed instructions on choosing an image and entering the information required. ! Use an image with an aspect ratio of 4. Thankyou File Invoice Image: If
|
 |
|
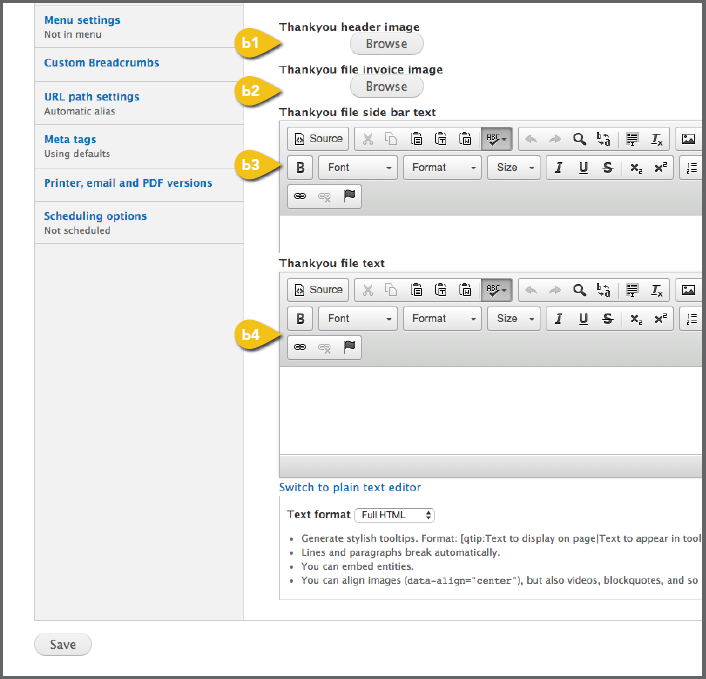
b. PDF File 1. Thankyou Header Image: If you have an image to appear in the header, add it here. Visit Add an Image for detailed instructions on choosing an image and entering the information required. ! Use an image with an aspect ratio of 2. Thankyou File Invoice Image: If 3. Thankyou File Sidebar Text: Enter 4. Thankyou File Text: Enter a message to be displayed in the sidebar. |
 |
|
Additional Content These tabs appear beneath the primary Get step-by-step instructions for the remaining Meta Tags Add page and content Meta Tags that Save Save your work by selecting Save at the |
 |
|
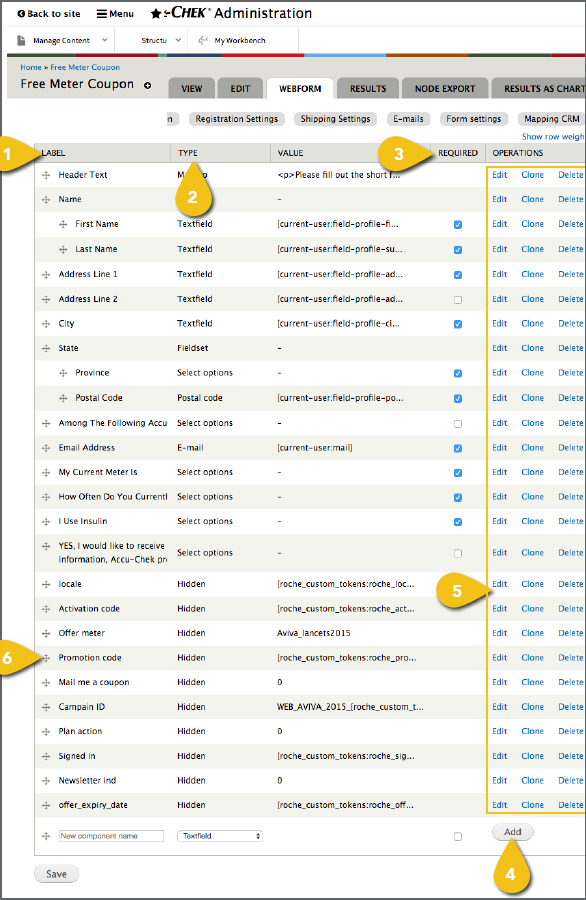
Step 2. Add and Configure Form Fields Expand the Menu option at the top of the browser window, and select Manage Content (rather than hovering over it to view the navigation options beneath it). Select Edit to the right of the name of the form you just created, then choose the Webform tab in 1. Label/New Component Name: Enter 2. Type: Select the type of information you ! To include introductory, footer or general text, enter “Intro,” “Footer,” or similar in the label field and choose Markup as the type. Click Add and include your text in the Value field that appears on the next page. 3. Required: Check the box at the right if the field is required. 4. Add: Select Add to enter more detail 5. Edit, Clone or Delete: At the far right, 6. Re-order Items: Select the four arrows |
 |
|
Component Details Upon adding a field, you will be sent to an Edit Component detail page. The most common field types are detailed below. You may also include field sets, user-uploaded files, rating grids for surveys and more in your forms. In addition, you can set up conditional questions that appear based on a user’s response, incorporate a variety of validation options and settings by clicking through the options under the Webform tab. 1. Label: Edit the label you provided, if 2. Field Key: Enter a distinct field key, if necessary for data processing, or the Label 3. Default Value: Enter a date, value or text for the field to default to if the user doesn’t change it. 4. Description: Provide text that will appear when the user hovers over the field, to 5. Encryption: Select this for any personally |
 |
|
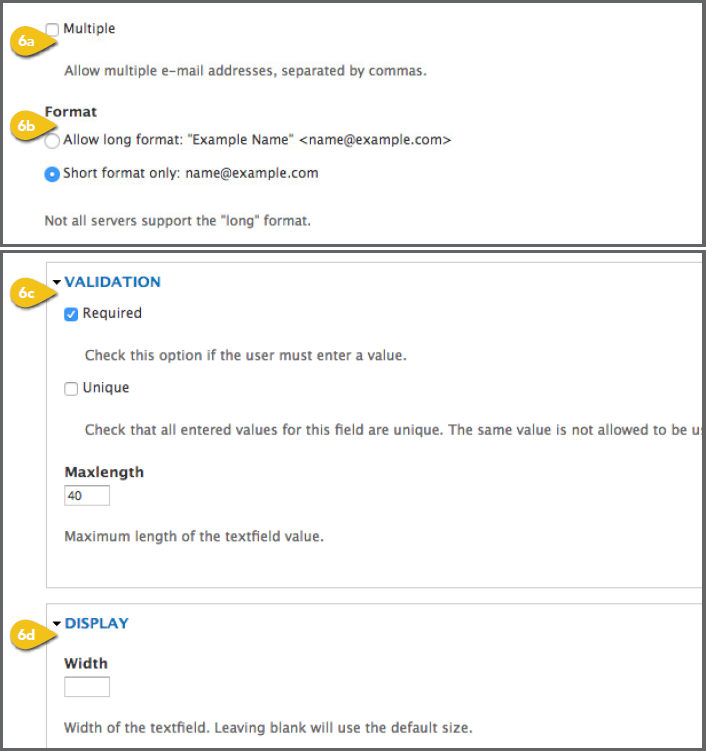
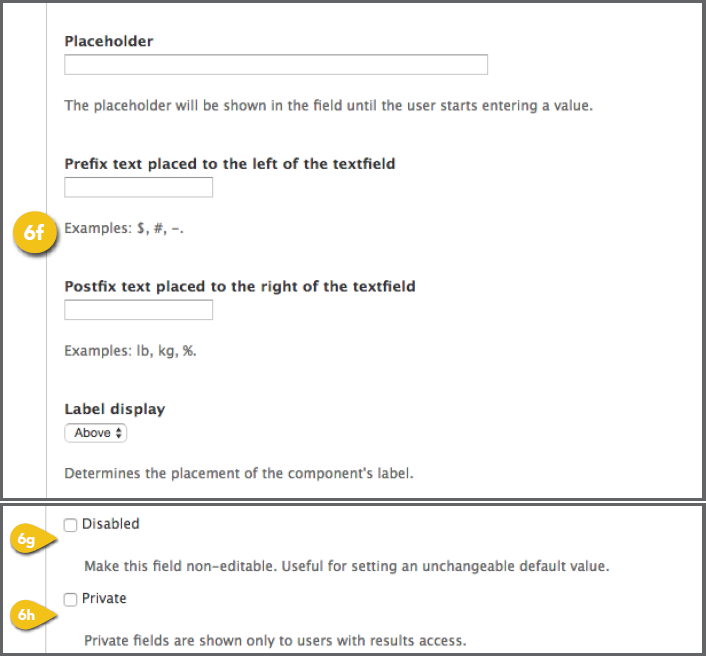
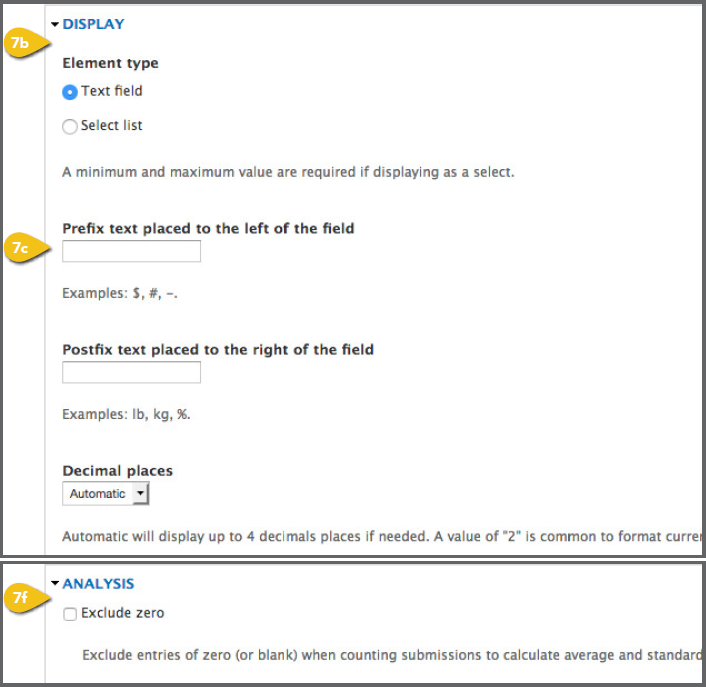
6. Text Fields and Areas, and E-mail Fields: a. Multiple (e-mail only): Specify whether b. Format (e-mail only): Mark Short c. Validation: Choose whether the field is d. Display Width: Specify a width for the text field, if you do not want to use the default. e. Display Height and Resizable (text f. Format Options: Specify any symbols g. Disabled: Check the box if users should not be able to edit the default text. h. Private: Check the box if this field should not be seen by public users |
|
|
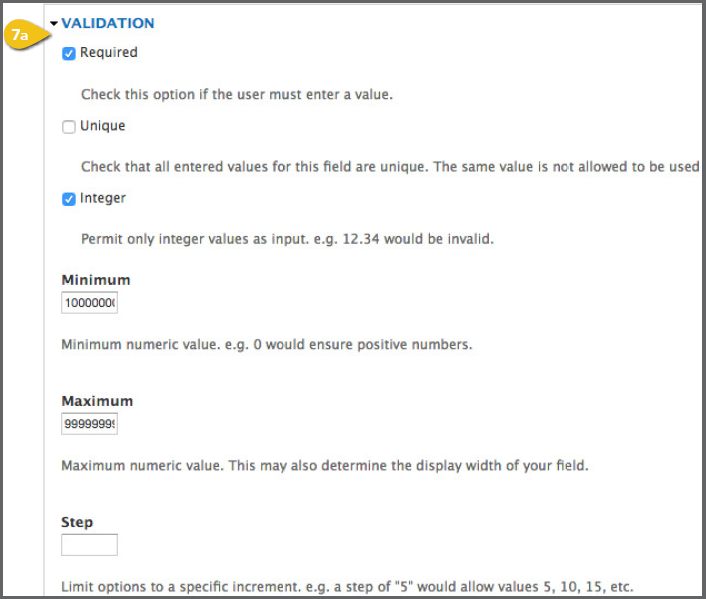
7. Number or Postal Code Fields: If you a. Validation: Enter details to ensure that b. Display/Element Type (number c. Format Options: Specify any symbols d. Disabled: Check the box if users should not be able to edit the default text. e. Private: Check the box if this field f. Analysis: Check Exclude Zero if you |
|
|
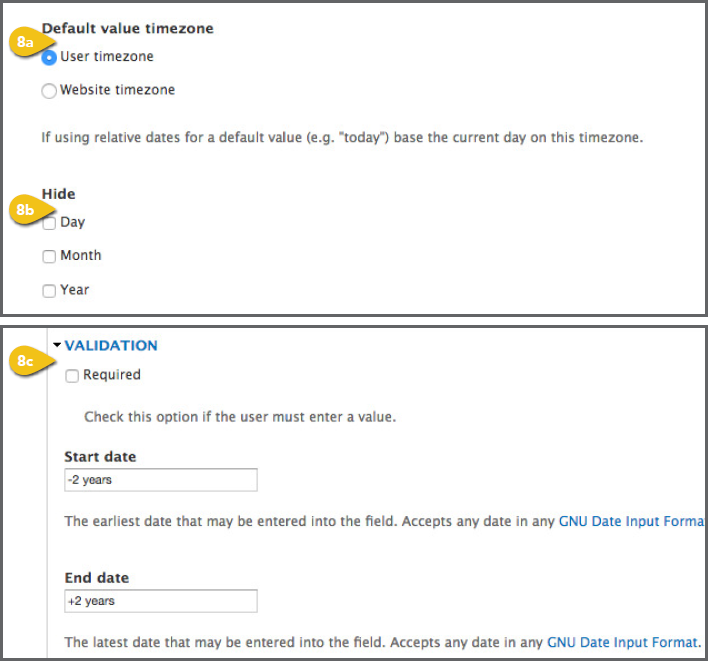
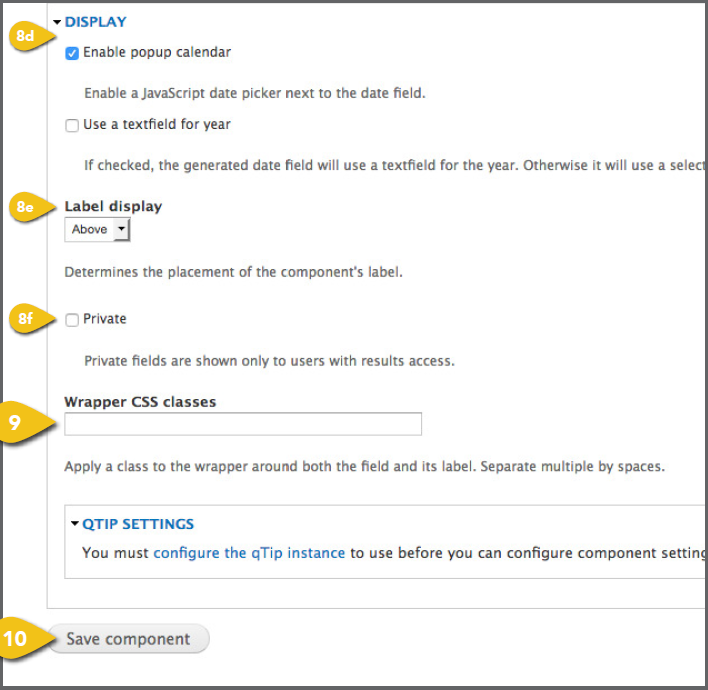
8. Date Fields: If you are editing a date field, a. Default Value Time Zone: The user is b. Hide: Remove unnecessary fields from c. Validation: Enter start and end dates to d. Display: Specify whether you would like to include a pop-up calendar and choose between a text field or drop-down list for the year. e. Label Display: Select whether labels appear in-line, instead of above the field. f. Private: Check the box if this field should not be seen by public users. 9. Wrapper CSS Classes and CSS Classes: 10. Save: Be sure to save each component |
|
|
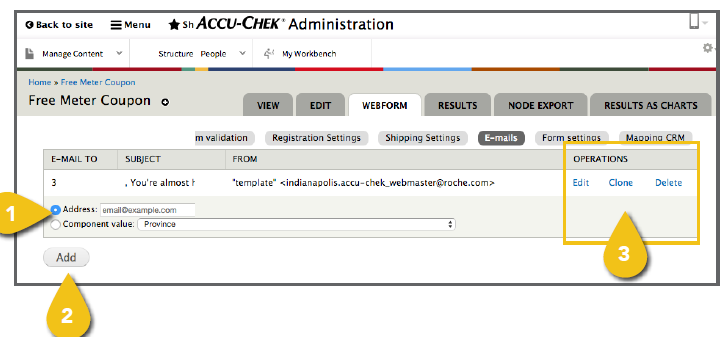
Step 3. Set Up Triggered E-mails You may choose to send an e-mail to a member of the customer service or sales team based on specific responses, or you may wish to send a confirmation e-mail to the user once the form has been completed. Select the E-mails tab within the Webforms submenu to get started. 1. E-mail Address • Address: To send an e-mail to • Component Value: To send an e-mail ! If you have selected Newsletter ID as the 2. Add: Select Add to enter more detail 3. Edit, Delete or Clone: Edit or Delete an |
 |
|
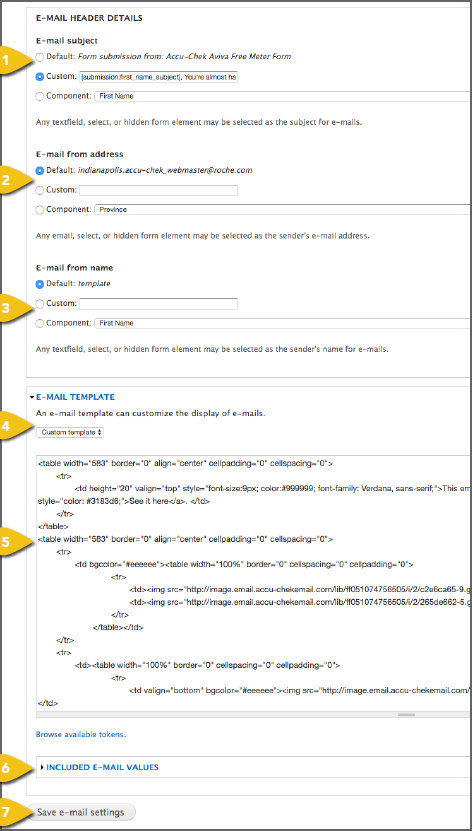
E-mail Details Upon adding an e-mail address, you will be sent to a detail page. 1. E-mail Subject: Enter a subject line for e-mails to users. For internal e-mails, you can enter a subject line or choose the default. You may also use a form component as the subject line. 2. E-mail From Address: Enter a user-friendly address for e-mails to users. 3. E-mail From Name: Enter a user-friendly department or program name, such as “Accu-Chek Customer Care” for e-mails to users. 4. E-mail Template: A default template is provided for internal e-mail messages. Choose Custom Template to create an e-mail to follow up with prospects or customers. 5. E-mail Body/Text Box: Enter the e-mail body text here. The body is HTML compatible. 6. Included E-mail Values: For e-mails to customer service, sales or other internal audiences, you will most likely want to include all the information provided by the user. For user-facing e-mails, you can select any data you would like to include. 7. Save E-Mail Settings: Save this configuration before adding another. |
 |
|
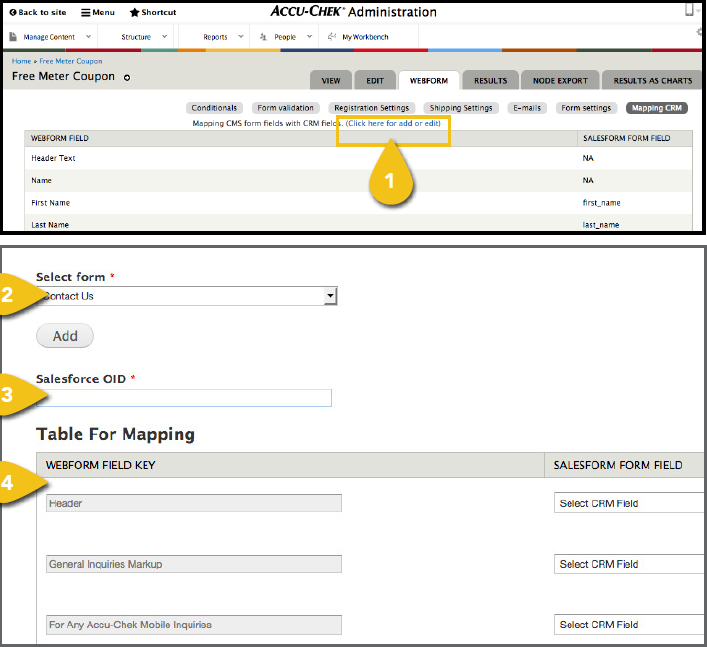
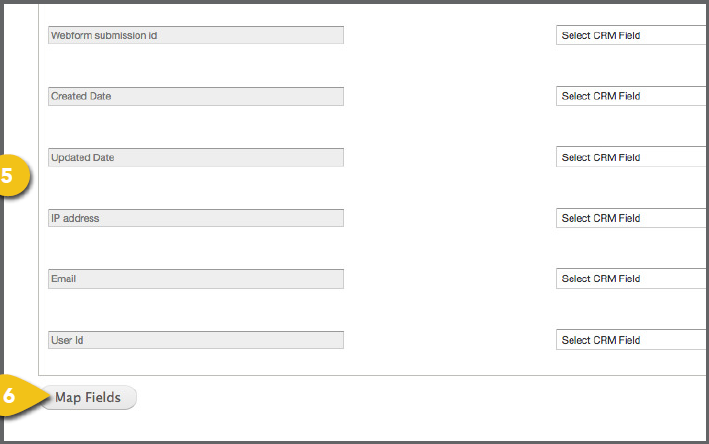
Step 4. Map Data to Your CRM Platform Connect your form field labels to the labels used by your CRM system to ensure that 1. Add or Edit: Select Click Here for Add or Edit at the top of the dashboard. 2. Select form: From the dropdown list, select one of the forms you’ve created to 3. Salesforce OID: Enter your the organizational ID issued to your company by 4. Webform Field Key: For each of your form fields or components in the left column, simply identify the corresponding field within the drop-down menu on the right. This will ensure that your CRM system is properly populated, even if you choose form labels that don’t match your CRM platform. 5. Inserted Fields: The WCMS inserts 6 hidden fields into every form—Webform 6. Map Fields: When you have completed |
|