If you use the Subscriber Key to identify your subscribers, the application deduplicates your data extension list based on the Subscriber Key value instead of the email address.
If you can send to a data extension, you can also use the send preview feature with the data extension. The send preview lets you see what the personalization and dynamic content will look like for an individual message recipient.
When you send an email to a data extension, the system uses the List Detective tool to scan the email addresses in the data extension. The List Detective protects your deliverability by preventing the sending of email to problematic addresses. The email addresses identified by the List Detective are not sent to, so the sends do not appear in your tracking. The email addresses in the data extension are not removed or changed by List Detective.
- Click Subscribers.
- Click Data Extensions.
- Under Actions click Send. The send option only displays for sendable data extension. To determine if a data extension is sendable, check the Sendable column on the data extension grid or check the Used For Sending field on the data extension properties.
- ClickNext.
- Select the email to send.
- Click Next.
- Choose Recipients Dialog Box- the lists previously selected will already be checked. Optional, you can add or remove groups and lists in this step.
- Select the target recipients you wish to send the email to. Can you send to lists or group, or data extensions with an associated publication list, or an Audience with an associated publication list, or a Data Filter with an associated publication list. Depending on the features enabled you may see different options. We recommend sending to a maximum of 50 lists. If you exceed that number you may have trouble viewing tracking for that send. When sending to data extensions or an audience check De-duplicate subscribers by email addressif you do not want subscribers to receive multiple emails.
- Click Next.
- Choose Excludes and Suppressions Dialog Box
- This box allows you to refine your recipients and is an optional step depending on your business needs. This option is only used when some subscribers are selected as recipients but you do not want to send to them. Any recipient that is listed as a target audience and listed on an exclude or suppression list will not get the email.
- Select the subscribers to exclude or suppression from this send.
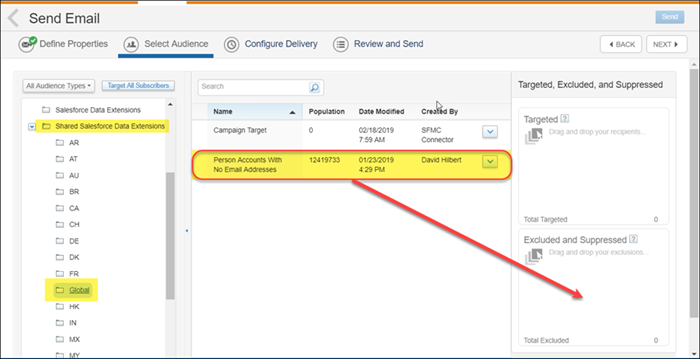
- (Note: ALWAYS include the data extension called Person Accounts With No Email Addresses in the Shared Salesforce Data Extensions > Global folder. This prevents error/cancellations caused by including records that do not have email addresses, or recently had the email address deleted.)
- This box allows you to refine your recipients and is an optional step depending on your business needs. This option is only used when some subscribers are selected as recipients but you do not want to send to them. Any recipient that is listed as a target audience and listed on an exclude or suppression list will not get the email.
- ClickNext.
- Send Options Dialog Box
- Subject - Select the Insert Dynamic Content icon next to the subject line to send a dynamic subject email. Select the Insert Personalization icon to add personalization to the subject line.
- Preheader- Preheader is text displayed after the subject line when an email is previewed. The preheader can be modified in email properties.
- From Options:
- If to choose a specific email address from which you want to send the email message, click the top radio button next toUse the following from name and address. Select the from name and address in the drop-down menu.
- If to use a send classification, click the radio button next to Select a send classificationand select the send classification from the drop-down menu.
- Override sender profile with: -Determines whether the interaction uses a different sender profile than what is specified on the send classification. If you select this checkbox, you must select a sender profile to use.
- Override delivery profile with: - Determines whether the interaction uses a different delivery profile than what is specified on the send classification. If you select this checkbox, you must select a delivery profile to use. If these options are not available in your account contact your account representative to have it enabled.
- Send Options:
- Allows you to select Send as Multipart MIME. The system will send both the HTML and Text version of the email, including the text version you have created, and whichever version is accepted by the subscriber's email client is delivered. If MultipartMIME is not enabled in your account contact your account representative to have it enabled.
- Allows you select Track all links found within this email. If you select this checkbox, the system collects tracking on the links.
- Allows you to select to Suppress this send from reports. If you select this checkbox, the email is sent to the designated list without the job appearing in reports. The job is automatically added to the Test Send Emails folder.
- Allows you to select Enable send logging to a data extension. If Send Logging is not enabled in your account representative to have it enabled.
- Allows you to select the Tracking Destination If you select a predefined folder, the job will automatically be placed in that folder at the time of send.
- Testing Options - If this feature is enabled in your account, the Email Send Wizard includes an option labeled Send All Emails to. An email is generated for each subscriber and delivered to a single test address that you specify. The key benefit of this option is that you are able to see exactly how each email looks to each subscriber. If you used personalization strings or dynamic content in the email, each email contains the data specific to the targeted subscriber. Emails that you send to a test list or via the Email Send Wizard's test option are charged to your account in the same way as any emails that you send to your subscribers. Keep in mind that the test email address will receive as many email messages as there are subscribers on the list or group selected. If the lists and groups you select contain many subscribers, using this feature may not be a feasible option contact your account representative to have it enabled.
- Click Next.
- Schedule Send Dialog Box
- Send Email- This box allows you to select whether to send your email Immediately or Later. If you choose Later, you can select the date and time of the send.
- Send Throttling- Send Throttling allows you to select a range of hours during which you want to send your email. A Start and End time required. You can also specify how many emails you want to send per hour during that time. Contact your account representative to have it enabled.

The system sends emails during the hours you specify every day (starting the day you send the email) until all of the emails are sent. When using Send Throttling you should not schedule the email in the upper half of the dialog box. Send throttling overrides scheduling, but scheduling the email can corrupt the send throttle process. It's imperative that you either schedule the email to send in the future or select the Send Throttle checkbox.
The system begins processing the email send job at the start time you specify. The send is not spread evenly between the start and end times. The system will continue sending during the specified time range until the send is complete or the end time you specified is reached, whichever comes first. If the end time is reached before the send is complete, the system will continue the send the next day at the same start time. This process continues until the send is complete.
You can use Send Throttling for the following reasons:
- To control inbound traffic to a website, meaning, the interest generated by email may result in server crashes due to too many people visiting.
- To limit the number of emails sent to a particular domain each hour.
- Click Next.
- Confirm Send Dialog Box
This box allows you to review the summary of your email's information before sending. If there are validation errors, you will see the Validations errors dialog box. - After verifying all the information is correct, select the This information is correctcheck box and click Send.