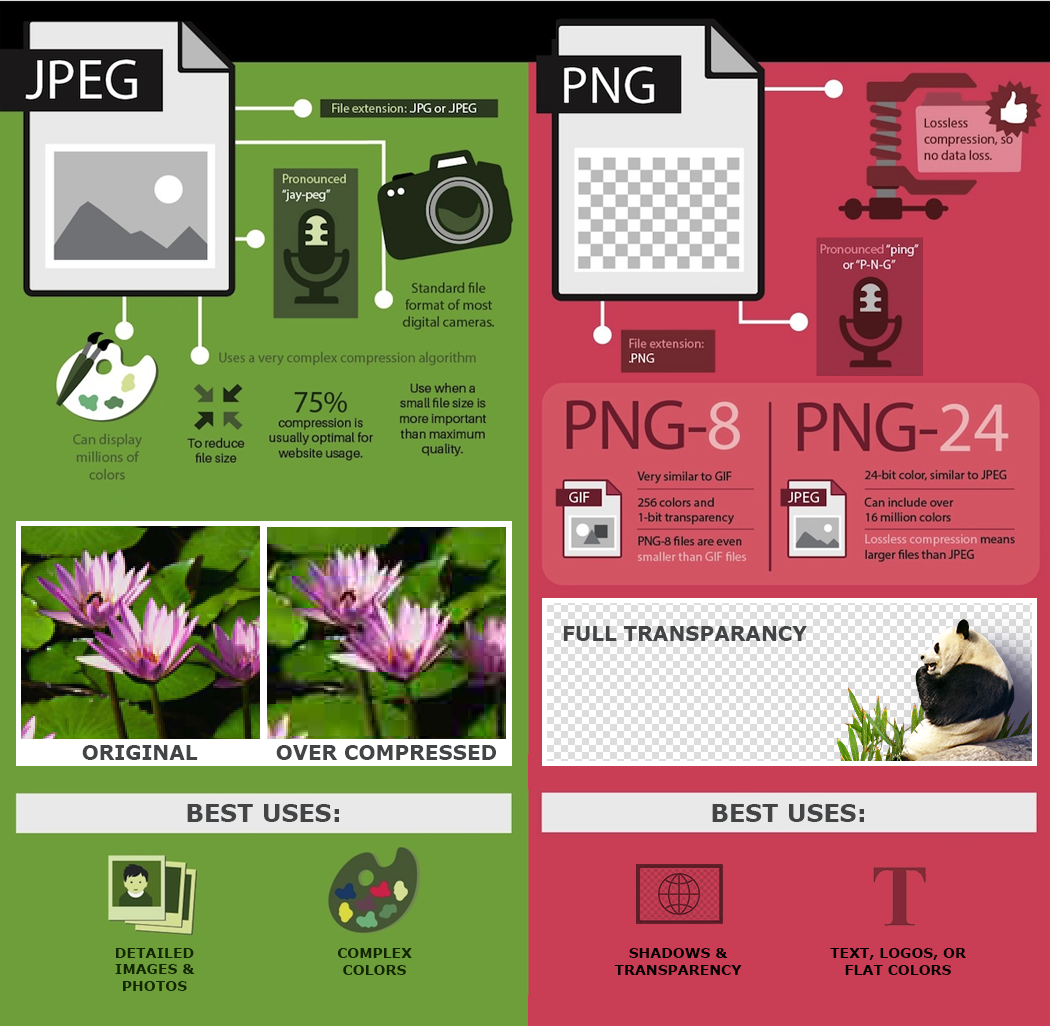
Proper Image Format
Before optimizing an image, it’s important to choose the proper image format. The two predominant web image formats are JPG and PNG. Here are a couple quick tips when choosing between the two file formats.
Choose JPG if:
- The image is a photo
- There is a lot of details or colors.
- The image doesn’t need to show any of the web page background behind it (aka, no transparency).
NOTE: When initially exporting your JPG from the photo editor (probably Photoshop), you can overoptimize JPGs to the point that they become grainy or blotchy which is a poor experience for visitors despite the smaller file size and quicker load times. An example of this is shown in the infographic below. Aim for an initial export quality of about 75% and can be higher if you process the image through TinyPNG, which we recommend.
Choose PNG if:
- There are few colors (aka flat) and/or text.
- The image is a logo or a shape with solid colors.
- The image has transparency in it and you want the page background to be visible.
This infographic can provide more explanation of the differences:
What about SVG, WEBP, or GIF file types?
There are a couple of new web media formats that are being used today, but they are harder to work with and not always compatible with older browsers. For your everyday web images, we recommend sticking with JPG and PNG formats. With proper optimization, you can achieve close to the same file compression and download speeds as the more complex alternatives. WEBP file sizes can be smaller but require a fallback solution for older browsers which means still loading a PNG or JPG. When it comes to logos and icons, SVG files are usually the best choice and are implemented in the web page at the template level by developers. Last, I will mention GIFs simply for the sake of their longevity on the web (since 1987) and to convey that they will most likely not be the ideal format for your needs.
TinyPNG Image Optimization Steps
There are other similar services, but this is the easiest. Despite the name, this works for JPEG/JPG images as well as PNGs. Before optimizing every image on your site, you can see if a page needs optimization by visiting the TinyPNG Analyzer. This will give you an estimate of what you might gain by running the images through the compression service.
Step 1: Visit TinyPNG.com
Step 2: Drag the image from your computer to the TinyPNG page and let it automatically compress your image.
Step 3: Click the download link and upload that image to the website as you normally would for other images.
This is quick and easy; I often see images reduced to 50-75% of the original file size which can make a noticeable difference for your visitors.